Draw a Circle Around Picture in Powerpoing
In this tutorial, y'all'll learn how to ingather pictures in PowerPoint using the different tools and features that PowerPoint provides. This gives you more control over the images you use in your presentations and does not crave Photoshop.
And there is more to cropping images than just resizing them for your slides. For example, you tin:
- Crop images into circles (or other shapes)
- Crop images into specific aspect ratios to fit your slides better
- Reduce your image file size by cropping out the parts you don't want

ARTICLE GIVEAWAY: Click hither to download a printable PDF of this how to crop pictures in PowerPoint commodity to continue by your desk-bound.
[Watch] How to Crop a Picture in PowerPoint
If yous determine to use the Crop to Aspect Ratio feature, you tin quickly and easily make neat slide backgrounds for your presentations.
To expand your knowledge and learn how to quickly create slide backgrounds using the Blueprint Ideas command (and how to troubleshoot information technology), read our guide here.
1. How to crop a picture (pace-by-step)
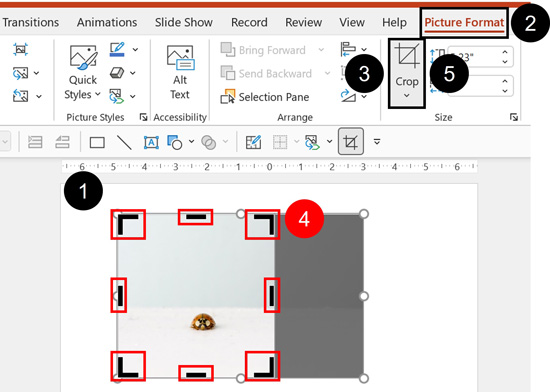
To crop a picture in PowerPoint, follow these steps:
- Select the picture you want to crop.
- Select the Picture Format tab
- Click the Crop control to enter cropping mode.
- Resize the Cropping Handles (they are black) on your photo.
- Select Crop again (or hit theEsc key) to exit cropping mode.
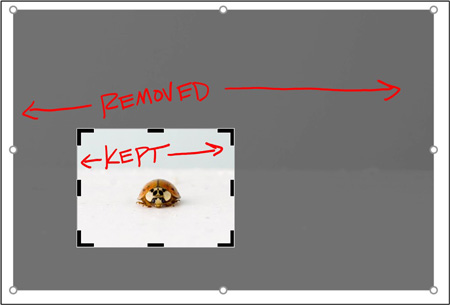
After y'all adjust the blackness handlebars on your flick, the grey or faded parts are what is removed from your image. Only the colorful parts of your picture remain afterward you lot close the Crop control as you can run across in the picture below.
If you accept a lot of pictures in your presentation, y'all tin can reduce your file size by compressing your images afterward you ingather them. To learn how to compress your images in PowerPoint, read our guide here.
Annotation: If you are using a moving-picture show or prototype that you found online, make sure you know how to properly cite it in your presentation. To larn all well-nigh how to cite sources in PowerPoint (including websites, pictures, and books), read our guide here.
two. How to ingather a picture into a circle (Crop to Shape)
Instead of merely cropping an prototype down to a normal square or rectangle, you can also utilise PowerPoint'south cropping tool to immediately crop your image into a circumvolve, triangle, or other shape.
There are two dissimilar ways to practise this. I personally prefer the second method – Intersect to Shape – but that feature is not available in all versions of PowerPoint. So, let's commencement look at the most bones way to ingather a picture into a shape.
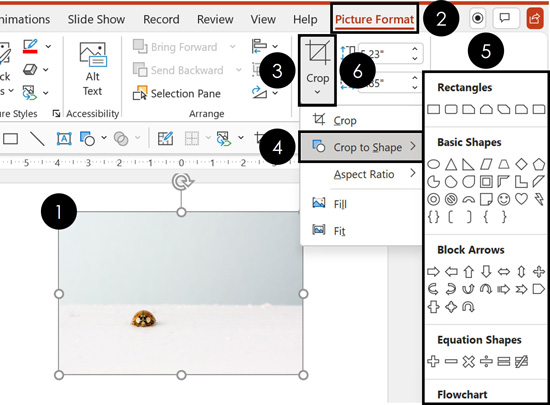
To crop a picture into a circumvolve in PowerPoint:
- Select the film y'all want to ingather.
- Navigate to the Motion picture Format tab.
- Open the Crop dropdown.
- Select Crop to Shape.
- Choose theCircle shape (or other shape to ingather your picture to)
- Click the Crop tool once more or hit Esc on your keyboard.
If you cropped a rectangular prototype into a circle, it will look like the oval beneath.

Notice how the ladybug is not centered perfectly inside of the oval? If this happens to y'all, you volition want to adapt the prototype. Yous tin can practice that manually or use the Offset Ten and Outset Y commands in the Format Flick dialog box equally discussed below.
Note: If you'd rather have your image be a circle instead of an oval, you need to first with a square picture (rather than a rectangle). Squares and circles have same height and width.
3. How to crop multiple pictures at once ('Power Cropping')
Instead of cropping your images one by 1, you can likewise save yourself a lot of fourth dimension by using SmartArt. This method allows you to apace crop and resize all your pictures at once (detailed below).
To see more PowerPoint tricks like this that will save y'all twoscore hours a year in PowerPoint in one case you lot start using them, check out my free speed grooming course here.
Alarm: This Power Cropping trick only works on PC versions of PowerPoint 2013 and later. If you lot have an before version of PowerPoint, this is i of many good reasons to consider upgrading soon. To check out the latest version of Microsoft Office (Office 365), check information technology out here.
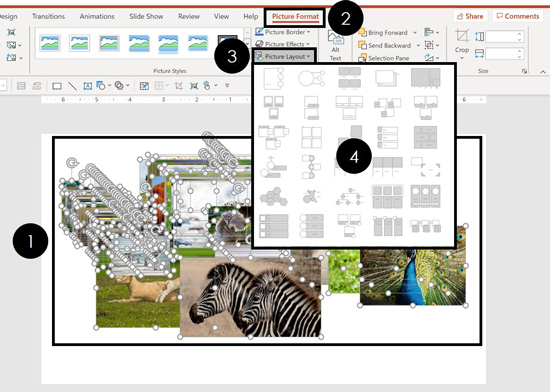
To crop and resize multiple pictures at the same time using SmartArt, simply:
- Select your images
- Navigate to the Moving picture Format tab
- Open up the Picture show Layout dropdown
- Select a SmartArt layout to crop your images
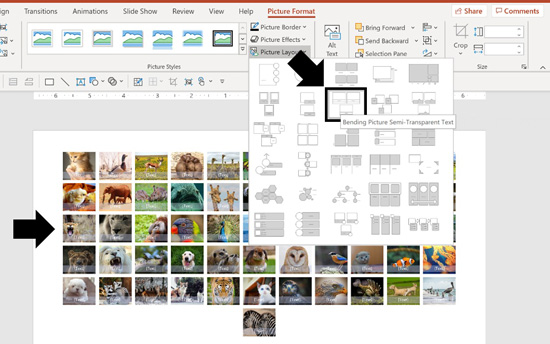
Every bit you hover over the dissimilar SmartArt layouts, you lot go a live preview of how your pictures volition be cropped and resized. Your goal at this phase is to discover the shape that gets you closest to the shape you are looking for. You tin adjust the shape subsequently.
Below is an example of cropping pictures using theBending Picture Semi-Transparent Text layout.
Afterwards you choose a layout, you can so interruption the SmartArt graphic apart so that you can freely piece of work with the cropped pictures.
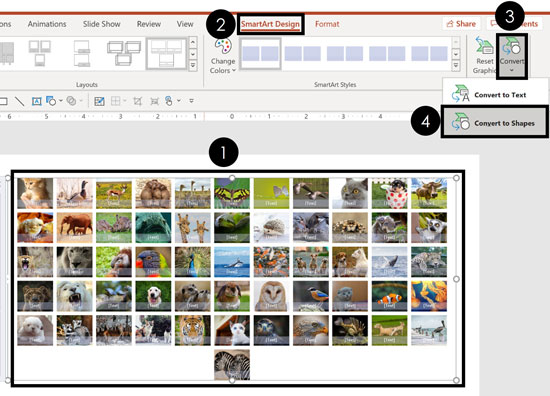
To pause your SmartArt graphic apart, simply hit Ctrl+Shift+G twice on your keyboardto Ungroup the object.
Alternatively, you tin employ the Convert to Shapes command:
- Select your SmartArt graphic
- Navigate to the SmartArt Blueprint tab
- Open the Convert dropdown
- Select Convert to Shapes
That turns your SmartArt graphic into a group of cropped pictures that you lot tin can then ungroup and use whatever way you like inside your presentation.If whatever of the pictures aren't cropped the mode you similar them, y'all can suit the cropping every bit discussed beneath.
iv. How to adjust a cropped image in PowerPoint

You tin adjust what parts of your cropped image show inside the cropped area in PowerPoint. To practice that, simply:
- Select the cropped pic
- Navigate to the Picture Format tab
- Select the Crop tool
- Motility the picture around within the frame (yous tin can just click and elevate, or readjust the black handlebars on the photo)
- Select the Crop command again (or striking Esc) to exit cropping mode
You lot can too conform your photo inside the cropped area using the Offset 10 and Start Y values in the Format Film dialog box. This is what I would recommend if you lot are stuck with an off-centered picture inside your circle ingather.
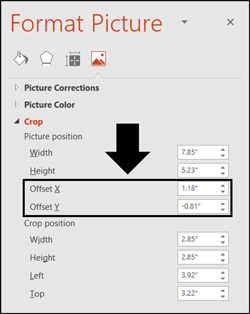
To adapt a cropped picture using the Get-go Ten and Offset Y values, but:
- Right-click your motion picture
- Select Format Picture
- Click on the Picture icon
- Under the Ingather area, adjust the Beginning X and Start Y fields
Adjusting the First X value moves your picture horizontally within your cropped area. Adjusting the Kickoff Y value moves your picture vertically inside your cropped picture expanse.
5. How to intersect a picture to a shape
The fastest and easiest fashion to crop to shape is to utilize the Intersect command in PowerPoint 2013 and subsequently (come across the latest version of Function here).
The reason information technology's faster and easier is that you can draw the shape direct over the role of the photograph that you want. This saves you from having to exercise all the manual adjusting.
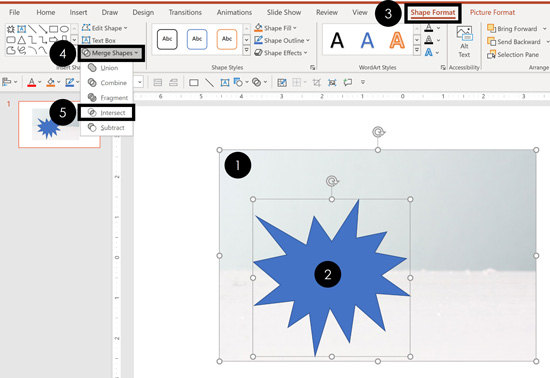
To crop a picture to a shape using the Intersect control in PowerPoint merely:
- Insert the PowerPoint shape that you want and place it on top of your photo (in the movie above I've inserted an Explosion: 8 Points shape).
- Select the pic.
- While belongings the Shift fundamental, now select the shape (if yous practice it in the reverse order it won't work).
- With the picture and shape selected, navigate to the Drawing Tools Format tab (or Shape Format tab).
- Open the Merge Shapes tool.
- Select the Intersect control.
Selecting Intersect, the intersection points between the shape and picture are combined, as pictured below.

There is a lot more than you can practise with your pictures in PowerPoint using the artistic effects. To expand your knowledge and learn how to utilise the creative effects options, encounter our guides below:
- To acquire how to catechumen a picture into a painting in PowerPoint (read our guide here)
- To learn how to catechumen an image into a drawing in PowerPoint (read our guide here)
half-dozen. How to ingather a picture to an attribute ratio
The fastest way to turn a photograph into a full-screen visual epitome for your slide background is to employ the Aspect Ratio crop tool.
This allows you to crop a photo down to either the sixteen:9 attribute ratio for widescreen monitors or the four:iii aspect ratio for printed slides.
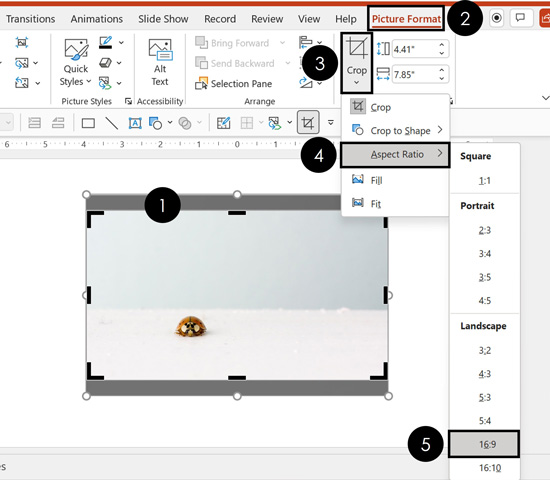
To ingather a picture to the 16:nine attribute ratio, but:
- Select the picture you want to crop.
- Navigate to the Picture Tools Format tab.
- Open the Ingather dropdown.
- Open the Attribute Ratio options.
- Cull your aspect ratio. In the pic higher up I chose xvi:9 for widescreen photos (another common attribute ratio is 4:iii for printed slides).
- Adjust your photo inside the frame.
- Hit the Crop command once again or hit Esc on your keyboard.
Once you lot accept cropped it to the 16:9 attribute ratio, your photo should fit perfectly on your 16:9 slide. Just make sure yous hold the Shift key while you enlarge your prototype, so y'all don't accidentally warp information technology.

The Crop to Attribute Ratio command works all-time on photos that take a lot of negative space (like sky and sand, as pictured below). That's because there is enough room in your photograph to be cropped out and still look similar a complete moving picture.
The negative infinite also works well for placing your content.
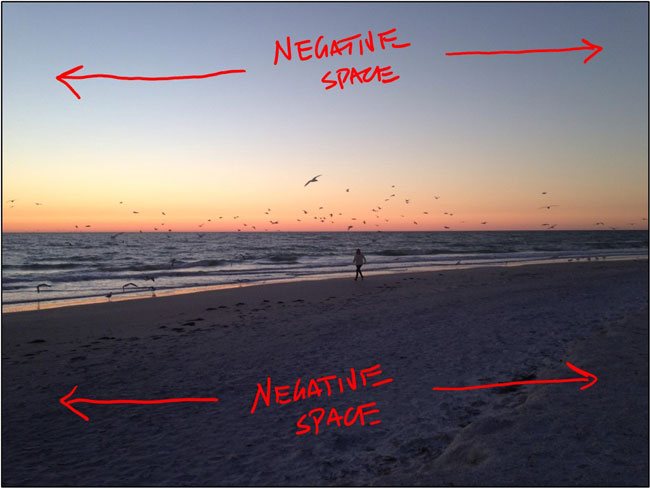
When you don't have a lot of negative space in your photo, cropping to attribute ratio increases the size of the principal people or objects in your photograph.
Instead of cropping your picture, y'all can remove the background (click here for details) or make your groundwork prototype transparent (click here for details).
vii. 3D pic cropping trick
Another clever cropping trick in PowerPoint allows you to create 3D pictures in PowerPoint, as you can meet with the apple below (what is known every bit an 'out of bounds' effect).
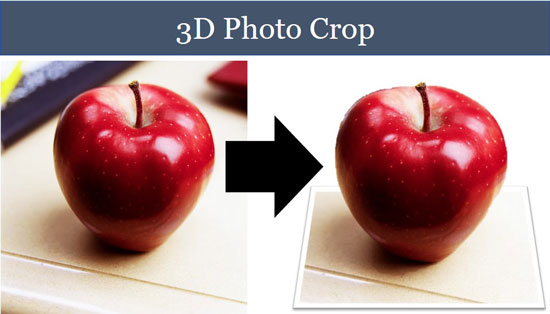
The trick is to overlay two photos and and so use the cropping tools to create the 3D upshot.
The 3-part procedure for creating a 3D image in PowerPoint is as follows:
- Find a high-quality image (see the web log postal service linked below for image requirements).
- Properly frame your flick in PowerPoint.
- Overlay and ingather your images down to create the 3D picture issue.
To see the step-past-step procedure for creating 3D pictures like this, read our guide hither.
Decision
Then that's how to crop a picture in PowerPoint, and a variety of the formatting options you lot have bachelor to you.
Like many things in PowerPoint, there are many means to do the same thing. Which one you use depends on your desired effect.
Because adding visual elements like photos is disquisitional to your success in designing your slides, I consider cropping photos a must-know in PowerPoint.
If yous enjoyed the depth of this tutorial and want to learn more about our online training courses and other complimentary resources, visit united states of america hither.
Your PowerPoint Misery Ends Hither!
Sign up now to see how 4 niggling-known secrets are turning peoples' PowerPoint headaches into high-fives… and saving them at least 40 hours each year.
You'll also become our newsletter with the best PPT tips on the web, which you tin unsubscribe from with 1 click.
We collect and protect your information in accordance to our Privacy Policy
Source: https://nutsandboltsspeedtraining.com/powerpoint-tutorials/crop-pictures-in-powerpoint/
0 Response to "Draw a Circle Around Picture in Powerpoing"
Post a Comment